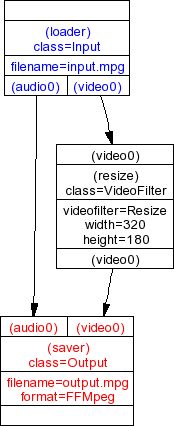
The way in which OpenVIP core processes multimedia files is based on a so-called network concept (as opposed to timeline concept employed in the GUI). We will use the following diagram to explain what networks are:

This is a scheme of a very simple network, which contains
instructions for OpenVIP to load a video file called
input.mpg, resize all its frames to 320x180 and save
it to output.mpg. Each rectangle in the scheme is
called a module. A module usually has some input or
output connectors, which link it with other
modules.
Let's explain it in terms of our example: There is a module called
loader, which is of type Input.
This module is indeed responsible of loading the file
input.mpg (this is the value of parameter
filename). The output connector
video0 of loader is linked to the
input connector video0 of a module called
resize, which is of type
VideoFilter. This module actually performs the
resize operation - there is a parameter videofilter
set to Resize, which tells the module what to do,
and a couple of parameters width and
height, which specify the new dimensions. Finally,
the output connector video0 of module
resize is linked to the input connector
video0 of another module called
saver, which is of type Output
and as you expect, it saves the video in the file
output.mpg.
Note that the output connector audio0 of module loader is linked directly to the input connector audio0 of module saver, which means that there is no audio processing.
To sum up: Each network consists of modules, which correspond to some actions, and connectors, which link the modules and specify the order of these actions. People who are familiar with graph theory would say that network is an acyclic oriented graph.
Networks are described using XML files which conform to the DTD file
openvip-network.dtd. To see that the structure of
such a file is really simple let's return to the example from previous
section and have a look at its XML version:
<?xml version="1.0" ?>
<!DOCTYPE network PUBLIC
          "-//OPENVIP//DTD Network Format V1.0//EN"
          "http://openvip.sourceforge.net/dtds/openvip-network.dtd">

<network xmlns="http://openvip.sourceforge.net/network-format" version="1.0">

    <module id="loader" class="Input">
        <param name="filename">input.mpg</param>
    </module>

    <module id="resize" class="VideoFilter">
        <param name="videofilter">Resize</param>
        <param name="width">320</param>
        <param name="height">180</param>
    </module>

    <module id="saver" class="Output">
        <param name="filename">output.mpg</param>
        <param name="format">FFMpeg</param>
    </module>

    <connect module_in="loader" conn_in="audio0" module_out="saver" conn_out="audio0"/>
    <connect module_in="loader" conn_in="video0" module_out="resize" conn_out="video0"/>
    <connect module_in="resize" conn_in="video0" module_out="saver" conn_out="video0"/>

</network>
The interesting part is that between
<network> and </network>
tags.
Each module is described using a <module>
element. The attribute id gives a unique module name
(may be chosen arbitrarily), while class describes the
type or specialization of the module. Every module can be passed one or
more parameters specified using the <param>
elements.
A link between the connectors of two modules is introduced using the
<connect> element - it simply means that the
output connector conn_in of module
module_in should be linked to the input connector
conn_out of module module_out. Most
modules use standardized connector names such as
audio0, audio1,
video0, video1 etc.
With a network description at hand, let's see how to process it by
OpenVIP. This is easily done with the OpenVIP commmand line interpreter.
Assuming that our XML network description is stored in file
test.openvip, the following command will do the
job:
cli test.openvip
If everything goes well, you should see a progress indicator and
after the processing finished, you will find the output file in the path
specified as a parameter to Output module.
Our example showed how to apply a resize video filter. What other modules are available in the OpenVIP distribution?
The documentation includes a list of all video filters including a description of their parameters. You can of course apply more than one video filter on a single input - the output connector of the first filter is then linked to the input connector of the second filter etc.
Audio filters are easy to use,
too. The module class is now AudioFilter and you
use audio connectors (audio0 etc.) instead of video
connectors. A chain of audio filters is built in the same way as with
video filters.
Video transitions and audio transitions belong to class
VideoTransition and AudioTransition,
respectively. They always have two input connectors and a single output
connector.
Input and output plugins
are responsible of loading and saving multimedia files. Input modules are
of class Input and they have no input connectors.
OpenVIP implements several input modules each of which can read different
file formats. You usually don't have to specify the input plugin type as
OpenVIP tries to autodetect which one to use. It is however possible to
deactivate the autodetection and specify which plugin to use in the
format parameter:
<module id="loader" class="Input">
   <param name="filename">input.mpg</param>
   <param name="format">FFMpeg</param>
</module>
Output modules are of class Output and they have
no output connectors. You must always choose an output plugin using the
format parameter:
<module id="saver" class="Output">
   <param name="filename">output.mpg</param>
   <param name="format">FFMpeg</param>
</module>
There are also other useful modules included in the OpenVIP distribution.